There are a few features in macOS Mojave which is integrating both Camera and macOS together. One of these features is the Continuity Camera. This feature lets you instantly take a photo from your MacBook or scan a document using your iPhone or iPad. The images are instantly available on your Mac. In this guide, we will share how to use Continuity Camera Feature in macOS Mojave.
How to use Continuity Camera feature in macOS Mojave
The interesting part of Continuity Camera is that it works with native Mac apps, including Pages, Keynote, Notes, TextEdit, and so on. Just before we start, make sure to use the same Apple ID on both the devices.
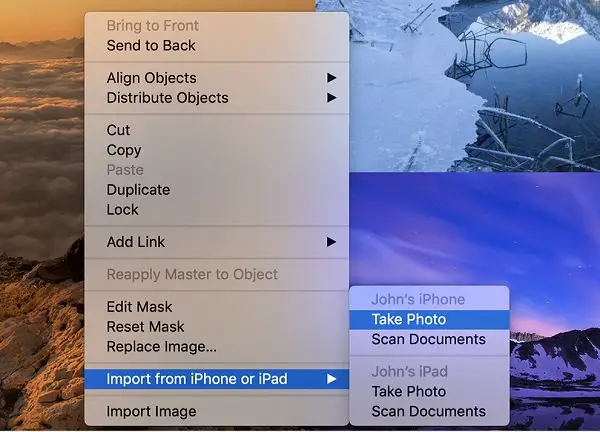
How to add a photo using Continuity Camera from iPhone and iPad
- Open the app that you want to import a photo into.
- Right-click on any location where you want to insert photo taken from your iPhone.
- In the menu, click Import Photo > Take Photo. This will launch camera app on your iPhone or iPad.
- On your iPhone or iPad, tap on the button to take a photo, then tap Use Photo. Your photo appears in the document or window on your Mac.

Note: If you have both the device, the will be listed as ‘Ashish iPhone’ / ‘Ashish iPad’ and will have a separate menu for scanning, and taking a photo.
How to scan a document using Continuity Camera from iPhone and iPad
- Open the app where you want to use Continuity Camera Feature. Right-click on the space where you want to take a picture, and then click Import Photo > Scan Documents.
- This will launch the camera on your device. Place your document in view of the camera on your iPhone or iPad, then wait for the scan to finish.
- You can also scan documents manually. You will need to manually tap the camera icon or one of the volume buttons.
- Next drag the corners to adjust the scan to fit the page, then tap Keep Scan.
All your scans will appear as PDF in the document folder on your Mac.
What do you think of this feature? Was it easy to use Continuity Camera Feature in macOS Mojave? Do you think it should have been more automated? Let us know in the comments.


